When skipping the kitchen island is the smarter move
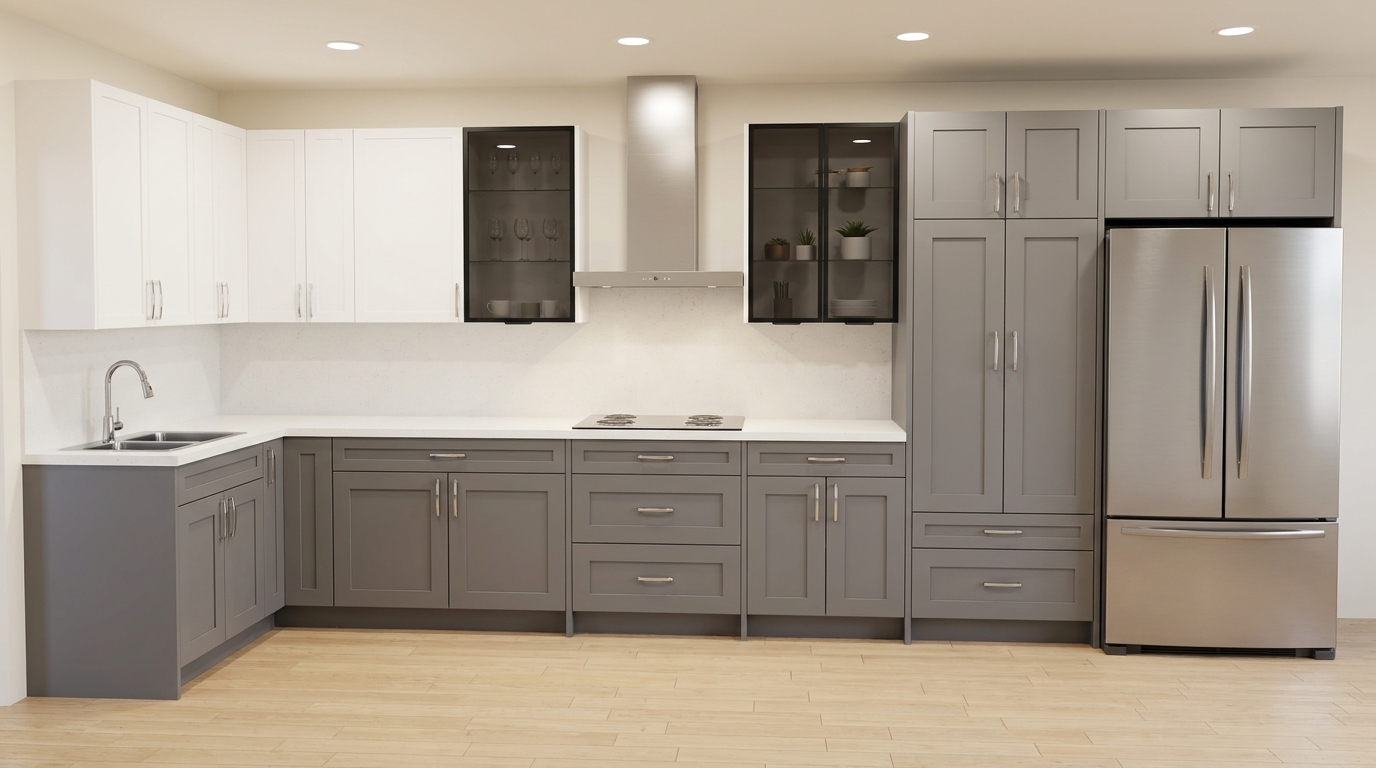
Livingetc reports that designers are increasingly questioning whether a forced kitchen island actually helps — or whether it blocks sightlines, eats clearance, and adds cost without adding function. This kitchen shows the payoff of restraint: dark charcoal shaker lowers and white shaker uppers run a complete L-perimeter, lit glass-front display cabinets flank a chimney hood, and a tall pantry tower claims the corner where a tight island would have choked the aisle. When the room and the lifestyle both say no, skipping the island is the confident choice — and the cabinet planning shifts accordingly.
The clearance math that kills the forced island
The NKBA minimum between an island and a facing counter is 42 inches — 48 inches if two people cook simultaneously. On a typical L-shaped kitchen where each wall runs 10 to 12 feet, adding a standard 48-inch-by-24-inch island leaves less than 42 inches on at least one side.
At 36 inches, a dishwasher door open 90 degrees extends 24 inches into the aisle. That leaves 12 inches to squeeze past — a pinch point that turns every load-and-unload cycle into a frustration. The 42-inch rule applies to every side of the island that faces a cabinet run, an appliance, or an obstacle, not just the main traffic aisle. In a compact L, that constraint often makes it mathematically impossible to fit a useful island without compromising at least one clearance.
Most people realize this only after they've ordered. The safer approach: tape the island footprint on the floor, place a person at the cooktop and another at the sink simultaneously, and open the dishwasher door. If it works, it works. If anyone has to step back or sideways, the island is too big for the room.
What the perimeter gains when the island goes away
A standard island footprint — 48 inches by 24 to 30 inches — consumes 8 to 10 square feet of floor space and splits the room into separate zones that traffic must route around. Remove it, and that floor area becomes open aisle.
More importantly, the perimeter gets longer runs. On a 12-foot cooking wall you can fit a 36-inch cooktop base, two 15-inch drawer stacks, a 33-inch base, and a 24-inch base — nearly 9 feet of continuous lower cabinets with uninterrupted countertop above. That kind of prep real estate is impossible when part of the run has to stop short to leave an aisle gap for island access.
In an L-shaped kitchen the two walls naturally divide by task: the long wall handles cooking and prep, the short return wall takes the sink and cleanup. Without an island forcing awkward traffic patterns between the two zones, that division works cleanly. Everything is within 4 to 6 steps of everything else — the compact version of the work triangle that originally made this layout popular before islands became mandatory.
The tall pantry tower: island storage without the footprint
An island typically houses a drawer stack for utensils, deep base shelving for pots and pans, and sometimes a seating overhang. A full-height pantry tower — 90 inches tall, 18 to 24 inches deep — replaces all of that in 24 inches of wall width.
The pantry in this kitchen sits in the natural appliance column: pantry tower, wall oven stack, refrigerator, reading left to right. That grouping keeps tall units together at one end of the L, preventing them from breaking up the lower counter run. The tower itself is typically built from two 15-inch-wide upper boxes stacked floor-to-ceiling, or one 24-inch full-height unit depending on the manufacturer. Interior pullout shelves — mounted on full-extension slides — mean every level is accessible without reaching to the back.
One constraint that catches people out: a tall pantry tower needs to be planned before counters are run. If you decide to add one later, you will need to remove a section of counter, reroute the toe-kick, and potentially adjust adjacent upper cabinets to maintain a continuous soffit line. Plan it in from day one.
Lit glass display uppers: the focal wall that replaces the island showpiece
Without an island as the room's visual anchor, the cooking wall has to work harder. Two black-framed glass-front upper cabinets flanking a chimney hood — each typically 30 inches wide by 30 inches tall — create a symmetrical focal point above the cooktop.
The warm glow visible in this kitchen comes from LED strip lights mounted on the underside of each internal shelf. A single low-voltage strip per shelf is enough; the key is running it toward the front of the shelf so the light falls on the objects rather than washing the back wall. The black frame finish is a matte powder-coat applied to a standard shaker door frame after the glass panel replaces the center rail — so the base cabinet is identical to every other upper in the run, just swapped to glass.
Common installation mistake: hanging these uppers too high in pursuit of an airy look. Standard wall cabinet bottom height is 54 inches from the finished floor — 18 inches above a 36-inch counter. Raising them to 58 or 60 inches disconnects the display from the counter below and makes the interior feel like it belongs to a different room. Stick to 54 inches unless there is a specific architectural reason to deviate.
Who should skip the island — and who should keep it
Skip the island when the L footprint is under roughly 120 square feet, when one or two people cook most nights, when an adjacent dining area already provides gathering space and seating, or when the budget is better spent on better perimeter cabinets, thicker countertop material, or a higher-specification cooktop.
Keep the island when the L arms are each 10 feet or longer, when the kitchen regularly serves groups, when you specifically need seating inside the kitchen itself, or when the cooktop is going into the island — because at that point the island is load-bearing for the cooking zone, not decorative.
The error that costs people the most is committing to an island on paper without modelling the worst-case traffic scenario: dishwasher open, refrigerator open, one person at the cooktop, one at the sink, and a third person walking through. That scenario happens multiple times a day in a household. If it does not work in the simulation, it will not work in the kitchen.
How to build this layout in the Flip designer
Start with the long wall. Place the cooktop base centered on the run, then build outward in both directions with standard base cabinets. Set the sink base on the return wall — the shorter arm of the L — so cleanup stays separated from prep.
Before closing off the corner, place the tall pantry tower at the junction of the cooking wall and the appliance column. The Flip designer treats full-height pantry units as their own category — place it first, then build the wall oven stack and refrigerator surround beside it. If you add it after running the counter line, you will need to delete and redo that section.
For the glass-front display uppers, swap the door style on the two uppers flanking your hood position from solid panel to glass. The designer applies the frame finish globally or per-cabinet — set those two to the contrasting frame color before placing the rest of the uppers so you can see the symmetry live as you build.
Finally, use the clearance overlay to confirm your aisle widths before you generate a quote. If no island appears in the plan, the floor plan will show clean open space — which is exactly the point.