Wrap Your Island in the Same Finish as Your Cabinets
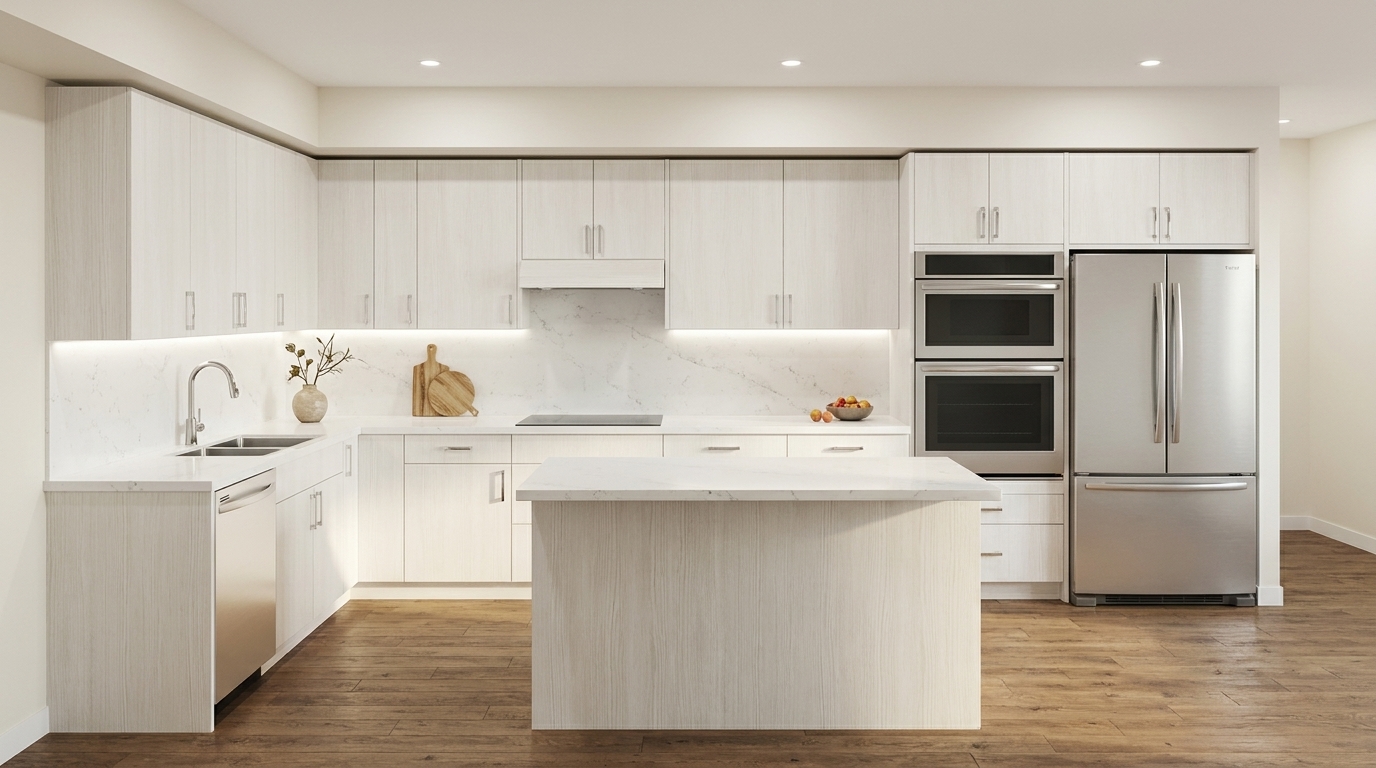
HGTV reports that the fastest way to make a kitchen island feel built-in rather than dropped-in is to finish it in the same material used on the perimeter walls. This kitchen shows the payoff: pale wood-grain flat-panel cabinets wrap all the way around the island sides, the marble-look slab backsplash runs uninterrupted behind the induction cooktop, and the result reads as a single designed room rather than a collection of furniture pushed together. Matching works here because the wood-grain texture has enough visual interest to carry the look on its own — no contrast needed.
What panel wrapping actually means in cabinet terms
An island is, at its core, a group of base cabinets assembled with their backs together or facing open room. The parts that face into the kitchen — the long sides and the two short ends — are raw cabinet box material unless you finish them deliberately. That finishing layer is an end panel: a 3/4-inch-thick piece in the same door finish, cut to the exposed height (typically 34 1/2 inches, matching the cabinet body before the countertop goes on) and the cabinet depth (typically 24 inches for a standard base cabinet). The panel sits flush with the door face so the transition is seamless, not stepped.
In this render, every visible island side carries the same pale wood-grain panel as the upper and lower perimeter cabinets. There is no exposed box material anywhere — the island reads as a solid volume of the same material that lines the rest of the room.
Why wood grain earns matching when painted finishes usually don't
The common advice for islands is contrast: white perimeter, gray island; gray perimeter, navy island. That advice was written for painted-door kitchens, where one flat color repeating on both surfaces can look like a mistake rather than a deliberate choice. A textured wood grain is different. The grain has direction, depth, and tonal variation that reads as material even when it repeats — the eye moves across the surface instead of reading it as a blank wall. Wrapping a wood-grain island in the matching panel extends the material story rather than diluting it.
The one caution with matching is grain direction. Upper cabinet doors typically run vertically. End panels on an island almost always run horizontally, because the 24-inch depth of a base cabinet is cut across the width of a panel sheet. If the grain pattern is pronounced and strongly directional — a heavy oak or a bold stripe pattern — the shift from vertical doors to horizontal island sides can look like a mismatch. Order a sample of the panel material and hold it in both orientations before committing to the layout.
Clearances and overhang: the numbers that come before island sizing
The National Kitchen and Bath Association sets 42 inches of clear aisle between any island side and the nearest counter or obstacle for a single-cook kitchen. For two cooks to pass each other comfortably, that clearance climbs to 48 inches. These numbers apply to the finished edge of the island end panel — not to the cabinet box center line. Measure from finished surface to finished surface.
This kitchen shows a prep island with no seating overhang — the countertop ends at the cabinet face. That is a deliberate choice suited to a dedicated work surface. If you want to seat people at the long side, the countertop on that side needs to extend at least 10 inches past the cabinet face to give a person's knees somewhere to go. Twelve to 15 inches is more comfortable for casual seating, and 18 inches is needed if the stools have armrests. Every inch of unsupported overhang beyond 12 inches requires a structural solution: corbels bolted to the cabinet sides, a steel bracket concealed inside the cabinet body, or a continuous support leg at the overhang corner. This is a fabrication decision, not a finish decision, and it has to be resolved before the countertop is templated.
Where the matched-finish island goes wrong
The first failure point is the countertop edge. If the island counter has a waterfall detail — the slab turning vertically on the end face — and an end panel is also finishing that same end, you have two finished surfaces arriving at the same corner. They need to be designed together: the panel stops, the stone waterfall takes over, and a return piece closes the raw edge gap cleanly. Neither the panel supplier nor the stone fabricator resolves this automatically. It needs to be drawn out before either is ordered.
The second failure is wear on the island sides. The long side of an island that faces into the kitchen takes far more physical abuse than any perimeter cabinet — chair legs scrape it, bags drag across it, children lean on it. Wood-grain laminate or vinyl panels show scratches and edge chip-outs more visibly than painted MDF. In a high-traffic kitchen, a painted accent color on the island's outward-facing sides — while using the matching panel only on cabinet-facing sides — is more durable than a fully wrapped island.
The third failure is in small kitchens. Matching every surface turns the room into one unbroken visual field. In a kitchen under roughly 150 square feet, or with an island shorter than 48 inches in any direction, a contrasting island does more work: it defines the island as a distinct object and helps the two zones read separately. The matched look earns its keep in mid-size to large kitchens where the island is big enough to hold its own volume.
How to build this in the Flip designer
Start by choosing your door style and finish in the Flip designer. Flat-panel doors are the standard starting point for a wood-grain look — the absence of a frame profile lets the grain pattern dominate the door face without visual interruption. Place your island base cabinets in the layout view before sizing them: click the perimeter counter edge to note the total room depth, subtract the minimum clearance aisle (42 inches for one cook, 48 for two), and whatever remains is your maximum island depth plus any countertop overhang you need for seating.
For each island cabinet side that faces open room, add an end panel in the matching finish. In the 3D view, the end panel appears as a thin element on the exposed face — check that it does not protrude past the door front. If it does, the panel depth setting needs to match your door overlay type. For the countertop, an eased or mitered edge profile complements the flat-panel doors without competing with the wood grain.