Ceiling-Height Upper Cabinets: The Planning Details That Matter
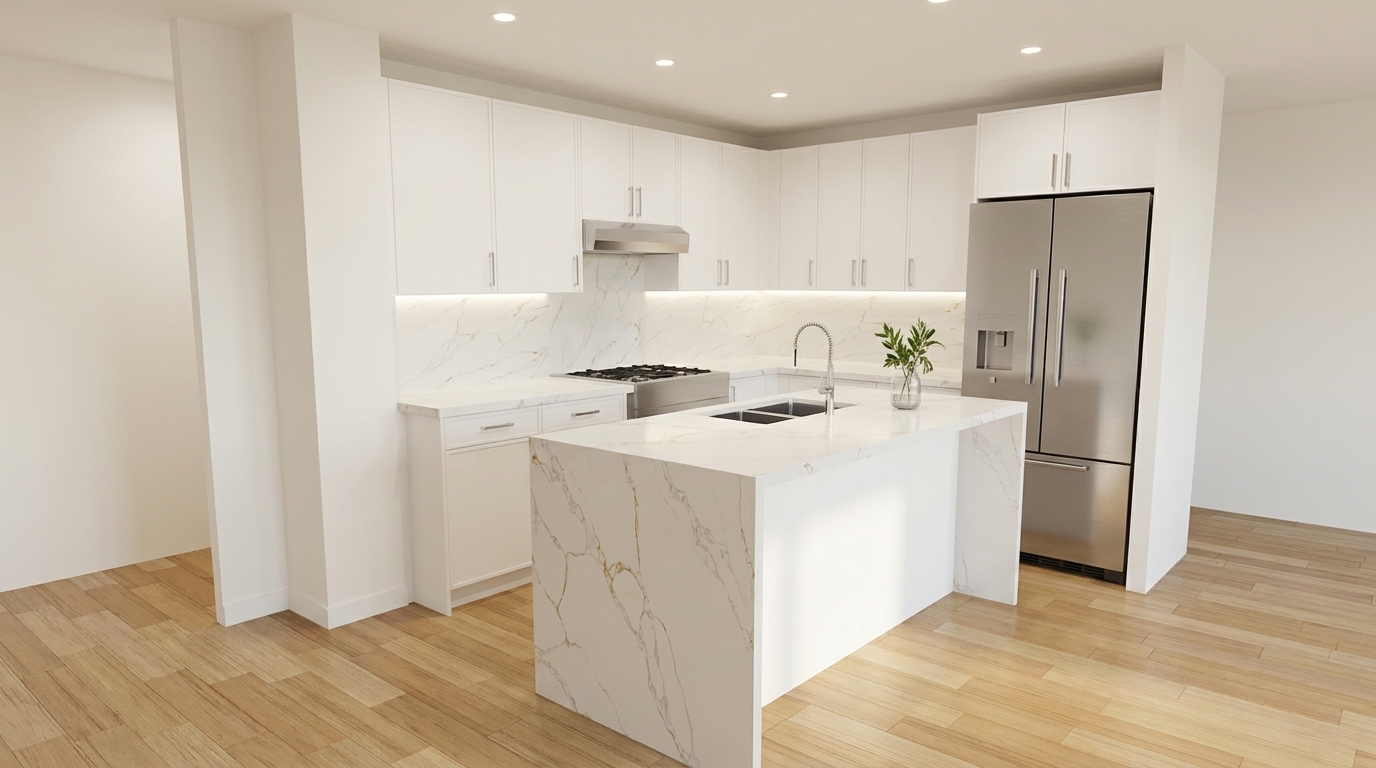
Apartment Therapy reports that running kitchen cabinets all the way to the ceiling is one of the most-requested moves in 2026 kitchen design — a shift driven by homeowners who are tired of the dead space above standard uppers and the grease-collecting gap that comes with it. This kitchen shows the payoff: white flat-panel doors run from countertop height all the way up, with a flush integrated hood sitting tight between the uppers above the gas cooktop — no chimney to break the line, no soffit gap to interrupt the vertical sweep. A gold-veined marble waterfall panel on the island provides the only contrast against the all-white cabinet run. Getting this look right involves a set of specific cabinet decisions that the finished photo never reveals.
What 'Ceiling-Height' Actually Means in Cabinet Numbers
Standard upper cabinets come in three common heights: 30 inches, 36 inches, and 42 inches. In a kitchen with 8-foot ceilings, a 30-inch upper mounted 18 inches above the countertop leaves a 24-inch gap between the top of the cabinet and the ceiling plane — that is a two-foot shelf of dead air that collects grease and dust. In a 9-foot kitchen the same cabinet leaves a 36-inch gap, wide enough to fit an entire second row of cabinets.
Ceiling-height cabinets close that gap entirely. Depending on your ceiling height you may use a single 42-inch upper, stack a 30-inch and a 15-inch box, or order a custom height. The math matters because most cabinet manufacturers build in 3-inch increments: if your ceiling finishes at 96 inches and your uppers mount at 54 inches, you need exactly 42 inches of cabinet to reach the ceiling — that works cleanly. A ceiling at 102 inches leaves a 48-inch run that requires stacking a 36-inch and a 12-inch, or a custom box. Knowing your exact ceiling height before you start planning saves a filler-strip problem at the end.
The Soffit Question: Remove It or Build Closed
Many older kitchens have a soffit — a framed-out box that fills the space between the top of the upper cabinets and the ceiling. Builders install them because standard 30-inch cabinets were the norm and the soffit hides the rough-in gap cleanly. To get the seamless ceiling-height look, you have two choices: remove the soffit, or build closed with taller cabinets that meet the ceiling and enclose the soffit behind new cabinet boxes.
Removing a soffit exposes whatever is inside — ductwork, wiring, plumbing — and requires patching and repainting the ceiling afterward. It is the cleaner long-term result but adds scope to the project. The build-closed route is less disruptive: new taller cabinets simply go in front of the existing soffit frame. The trade-off is that the overall cabinet depth may be constrained by whatever obstruction sits inside the old soffit box.
Either way, the finished joint between the top of the cabinet and the ceiling requires a decision: a filler strip cut to the exact height of the gap, a light-rail molding that bridges up to about half an inch of variation, or a direct flat butt joint caulked flush. Textured or sloped ceilings need a scribed filler strip; flat drywall ceilings can usually accept a direct butt joint with a flexible paint-grade caulk.
How the Range Hood Changes the Cabinet Plan
The biggest variable in ceiling-height cabinet planning is the range hood. A chimney hood requires a clear duct chase from the hood body up through the ceiling — typically 6 to 8 inches of duct diameter — and that chase has to go somewhere. In a kitchen where upper cabinets run to the ceiling on both sides of the cooktop, the duct chase either cuts through a cabinet box (losing that storage) or punches directly through the ceiling plane behind a built-up bulkhead.
This kitchen sidesteps that conflict with an integrated or insert-style hood — a thin stainless unit that sits flush between the upper cabinets, with the duct running horizontally through the soffit zone rather than vertically through a tall chimney. An integrated hood typically mounts 18 to 24 inches above the cooktop surface and takes up the width of one standard 30-inch cabinet opening. A door or filler panel above it continues the ceiling-height cabinet run so the wall reads as one unbroken surface.
The trade-off compared to a statement chimney hood: insert hoods are generally quieter at equivalent airflow ratings, but a chimney hood with a larger capture area can pull more smoke before it spreads. If you want a visible chimney hood, plan a cabinet-free zone on both sides of the cooktop and budget for the duct chase to be hidden inside the ceiling structure.
Why Flat-Panel Doors Work Best at Full Height
The door style in this kitchen — flat-panel or slab — is not just an aesthetic choice. It performs better at ceiling height than shaker because the door face has no horizontal rail that can look clipped when the cabinet box is cut to a non-standard height to meet the ceiling. Shaker doors have a top rail that reads as a deliberate detail; when that rail is compressed by a shallow filler box, it looks like an error rather than a choice.
Flat-panel doors read as a continuous face regardless of box height, which makes them forgiving when the ceiling height does not divide evenly into standard cabinet increments. At the ceiling line itself, the finishing option is either a flat top that butts directly to the drywall — clean, but it needs precise installation and a flexible caulk joint to allow for seasonal movement — or a light-rail molding that spans minor gaps. In this kitchen the flat-panel doors and the minimal profile of the integrated hood create a single coherent surface from countertop to ceiling, with no molding interruption.
Who Should Choose Ceiling-Height Cabinets (and Who Should Think Twice)
Ceiling-height cabinets make the most sense in kitchens with ceilings of 9 feet or more, open-plan spaces where the kitchen wall is visible from a living or dining area, and households where the top 12 to 18 inches of storage will realistically be used — bulk items, seasonal platters, and appliances used a few times a year rather than daily-use plates.
The honest trade-off: the top shelf of a 42-inch upper starts at roughly 84 inches from the floor. Anyone under about 5 feet 8 inches needs a step stool every time they reach it. If your household never uses the shelf above 72 inches today, adding another 12 inches of cabinet does not add usable storage — it adds a display zone you have to intentionally style or accept leaving empty.
In an 8-foot kitchen the math is harder still. A 42-inch upper stacked tight to an 8-foot ceiling produces a top shelf that is effectively unreachable without a dedicated step stool, and the compressed proportions rarely read as well as they do at 9 feet. The look works best when the ceiling gives the cabinet run room to breathe.
In the Flip designer, the easiest way to try ceiling-height uppers is to select the tallest available upper cabinet height for your wall run, then place a matching filler panel above any hood or appliance location where a full cabinet box will not fit. Pair it with a flat-panel door style to get the clean-face result shown here, and use the free quote tool to see exactly how many additional cabinet boxes the extra height adds to the project.